Monday, June 23, 2008

Managing code customisations with Git (Part Two)

In my first post I showed how I use Git rebase to integrate upstream code changes into projects.

In this second post I'll show a simple way to manage client code branches. (Well, simple compared with CVS and SVN).

In this example, I imagine that each client has their own custom changes to the core code base, and also packages that live in a client directory in their own part of the code tree.

I'll be assuming that you already have a repository to work with. In this case I have committed all the public releases of MySource Matrix (the CMS I use at work) to Git, creating a new branch for each public release.
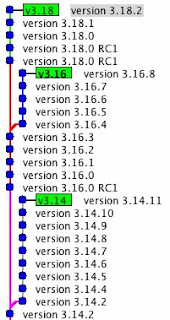


We start at the prompt:

qed:~/mysource_matrix [master] $

The current working copy is at the head of the master branch, which in this case contains release 3.18.2. The current branch name is shown in my prompt.

First, I'm going to change to the 3.16 branch of the repo and create a client branch. In Git this is done with the checkout command.

qed:~/mysource_matrix [master] $ git checkout v3.16
Checking out files: 100% (2426/2426), done.
Switched to branch "v3.16"
qed:~/mysource_matrix [v3.16] $


We are now at the head of the 3.16 branch. The last version on this branch (in my case) is 3.16.8.

I'll create a client branch.

qed:~/mysource_matrix [v3.16] $ git checkout -b client
Switched to a new branch "client"
qed:~/mysource_matrix [client] $


In the real world this would be a development repository, so there would be a lot of other commits and you'd likely base your branch off a release tag, rather than the head.

To keep things simple I am going to make two changes - one to an existing file, and add one new file.

The first alteration is to the CHANGELOG. I'll add some text after the title.

After making the change, we can see the status of Git:

qed:~/mysource_matrix [client] $ git status
# On branch client
# Changed but not updated:
# (use "git add ..." to update what will be committed)
#
# modified: CHANGELOG
#
no changes added to commit (use "git add" and/or "git commit -a")


You can also see the changes with diff.

qed:~/mysource_matrix [client] $ git diff
diff --git a/CHANGELOG b/CHANGELOG
index a1240cb..54f5f50 100755
--- a/CHANGELOG
+++ b/CHANGELOG
@@ -1,4 +1,4 @@
-MYSOURCE MATRIX CHANGELOG
+MYSOURCE MATRIX CHANGELOG (Client Version)

VERSION 3.16.8

So I'll commit this change:

qed:~/mysource_matrix [client] $ git commit -a -m"changed title code in core"
Created commit 54a3c24: changed title code in core
1 files changed, 2 insertions(+), 2 deletions(-)


(I'm ignoring the other change to the file - an extended character replacement that my editor seems to have done for me).

Now I'll add a file outside the core - one in our own package. Looking at git status:

qed:~/mysource_matrix [client] $ git status
# On branch client
# Untracked files:
# (use "git add ..." to include in what will be committed)
#
# packages/client/
nothing added to commit but untracked files present (use "git add" to track)


We need to add this file to Git as it is not currently tracked:

qed:~/Downloads/mysource_matrix [client] $ git add packages/client/client_code.inc

And then commit it.

qed:~/mysource_matrix [client] $ git commit -m"added client package"
Created commit 82ac0ed: added client package
1 files changed, 5 insertions(+), 0 deletions(-)
create mode 100644 packages/client/client_code.inc


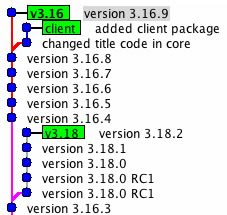
Looking at gitk you can see that the client branch is now two commits ahead of the 3.16 branch.


We'll assume that this client code is now in production, and a new version of Matrix is released.

In order to move the 3.16 branch forward for this example, I'll add the latest release. First I'll checkout the code branch that we based our client branch on:

qed:~/mysource_matrix [client] $ gco v3.16
Switched to branch "v3.16"


If you check in the working directory you'll see that any changes have gone. The working directory now reflects the state of the head of the new branch.

I'll extract the new code release over the top of the current working copy.

qed:~/$ tar xvf mysource_3-16-9.tar.gz

If we look at git status we can see some files changed and some files added.

qed:~/mysource_matrix [v3.16] $ git status
# On branch v3.16
# Changed but not updated:
# (use "git add ..." to update what will be committed)
#
# modified: CHANGELOG
# modified: core/assets/bodycopy/bodycopy_container/bodycopy_container.inc
# modified: core/assets/designs/design_area/design_area_edit_fns.inc
# SNIP: Full file list removed for brevity
# modified: scripts/add_remove_url.php
#
# Untracked files:
# (use "git add ..." to include in what will be committed)
#
# packages/cms/hipo_jobs/
# packages/cms/tools/
no changes added to commit (use "git add" and/or "git commit -a")


Then add all changes and new files to the index ready to commit:

qed:~/mysource_matrix [v3.16] $ git add .

I'll then commit them:

qed:~/Downloads/mysource_matrix [v3.16] $ git commit -m"v3.16.9"
Created commit ea7a183: v3.16.9
33 files changed, 1412 insertions(+), 110 deletions(-)
create mode 100755 packages/cms/hipo_jobs/hipo_job_tool_export_files.inc
create mode 100755 packages/cms/tools/tool_export_files/asset.xml
create mode 100755 packages/cms/tools/tool_export_files/tool_export_files.inc
create mode 100755 packages/cms/tools/tool_export_files/tool_export_files_edit_fns.inc
create mode 100755 packages/cms/tools/tool_export_files/tool_export_files_management.inc


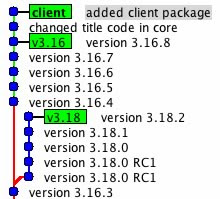
Let's look at gitk again:


You can see that the 3.16 branch and the client branch have split - they both have changes that the other branch doesn't. (In practice this would be a series of commits and a release tag, although people using the GPL version could manage their local codebase exactly as I describe it here).

There are two ways to go at this point, rebase and merge.

Rebase

This can be used in a single local repository.

Rebase allows us to reapply our branch changes on top of the 3.16 branch, effectively retaining our custom code. (The package code is not a problem as it only exists in our client branch.)

Rebase checks the code you are coming from and the code you are going to. If there is a conflict with any code you have changed on the branch, then you'll be warned that there is a clash to resolve.

Let's do the rebase:

qed:~/mysource_matrix [client] $ git rebase v3.16
First, rewinding head to replay your work on top of it...
HEAD is now at b67fef6 version 3.16.9
Applying changed title code in core
error: patch failed: CHANGELOG:1
error: CHANGELOG: patch does not apply
Using index info to reconstruct a base tree...
Falling back to patching base and 3-way merge...
Auto-merged CHANGELOG
Applying added client package

I'll walk though each step of the process:

qed:~/mysource_matrix [client] $ git rebase v3.16

This is telling git to rebase the current branch on top of the head of the v3.16 branch.

First, rewinding head to replay your work on top of it...
HEAD is now at b67fef6 version 3.16.9


git is changing the working copy (this is a checkout, and it shows the commit message).

Applying changed title code in core
error: patch failed: CHANGELOG:1
error: CHANGELOG: patch does not apply
Using index info to reconstruct a base tree...
Falling back to patching base and 3-way merge...
Auto-merged CHANGELOG


The next block is git re-applying the first commit you made on your client branch on top of the the checkout.

In this case git found the line we changed in the core and was able to auto-merge the change.

Applying added client package

This last line was the second commit. As this contained new files not in the core, the patch was trivial.

This is what the rebase looks like:
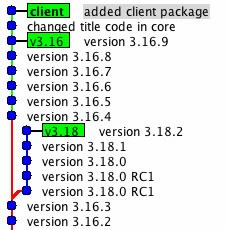


You can see that the branch appears to have been removed from the original branch point (release 3.16.8) and reconnected later (release 3.16.9).

Merge

Merge is the best option when you want to make the client branches and their histories available to other people. This would happen when there are multiple developers working in the same code.

The following merges the current state of the 3.16 branch (release 3.16.9) into the client branch.

qed:~/mysource_matrix [client] $ git merge v3.16
Auto-merged CHANGELOG
Merge made by recursive.
CHANGELOG | 126 +++++
.../bodycopy_container/bodycopy_container.inc | 11 +-
.../designs/design_area/design_area_edit_fns.inc | 6 +-
SNIP: a bunch of file changes and additions
create mode 100755 scripts/regen_metadata_schemas.php


All new files are pulled in, and any other changes are applied to existing files. Custom changes are retained, and conflicts are marked. This is what the merge looks like:
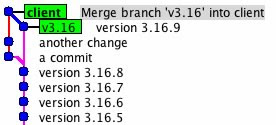


At this point you can retain the client branch and merge from 3.16.10 when it arrives (or indeed from 3.18 if you want).

If thing go wrong (there is a conflict) you'll get the change to resolve the conflict. Git will give a range of options. You'll need to resolve any conflicts.

A conflict will occur when the current branch and the merge target have the different changes on the same line (or lines). This can be manually resolved, and this ensures that your custom changes are retained (or updated).

Just released in git 1.5.6 is the ability to list branches that have been merged (and not merged) to the current branch. This would be useful to see what code has ended up in a client branch.

I'd suggest you view the gitcasts for rebase and merging, as these show how to resolve conflicts and some other advanced topics.

A few other points

1. You should not publish branches that have been rebased. The manpage is clear:
"When you rebase a branch, you are changing its history in a way that will cause problems for anyone who already has a copy of the branch in their repository and tries to pull updates from you. You should understand the implications of using git rebase on a repository that you share."
This might be a problem if many developers are sharing code from a 'master' git repository, and more than one need access to these branches. Better to use merge in these cases.

2. The repository I have shown here is somewhat subversion-esque in that there is a trunk and release branches. It would be just as simple to have the master branch being stable and containing tagged releases, with all the development and bug fixes being done on other branches. (Bugs fixes and development work are merged back into the stable release [master] branch). This is how many git repositories are set up, and this also is the way I tend to use it for new projects.

3. Because branching (and merging) is so simple in Git, I use it all the time. You can do all sort of useful things. For example, you could branch off a client branch, add some special feature, and then merged this back into any other branch - another client, release, or development. You could base a feature of a particular tag, merge it into two client branches, update it for PHP5, update the client branch packages for PHP5, merge in the feature and then merge in the upstream PHP5 changes.

SVN users have probably passed-out at this point.

Have fun.

Saturday, June 21, 2008

Managing Code customisations with Git (Part One)

After using Git for a couple of months on projects of my own, I learnt how to use rebase to move a branch from one commit to another in the repository.

There are two scenarios where this is useful.

The first is when you deploy code from an open source project, and then make custom changes to that code. You then want to pick up bug fixes and features from an upstream release.

The second is managing client code branches (which I'll talk about in part two).

Shocking as it seems to me now, in the 'old days' I used to keep a changelog which listed all the changes that had been to made to code. Embarrassing.

Here is what I do know, in my day job.

We use MediaWiki internally, but have carried out a number of customisations and patches to add features that are not in the standard release. Some of these are extensions, but a few require changes to the core code.

Managing this in Git has made the task a whole lot simpler than it used to be.

Firstly I created a repository of the standard release by untaring the code, cding into the directory and running:

qed ~/wiki $ git add .
qed ~/wiki $ git commit -m"The initial commit"


The second step was to create a branch for our customisations.

qed ~/wiki $ git checkout -b radiowiki

I then installed the wiki and committed the changes in our new branch. For testing I have a local copy of the repository where testing is done, and changes are backed up in the master repo.

When a new release of the MediaWiki software is out, I change back to the master branch (on the staging server):

qed ~/wiki $ git checkout master

and then untar the new code over the top of the old.

After committing, it is the a simple matter to checkout our branch:

qed ~/wiki $ git checkout radiowiki

and rebase this off the master.

qed ~/wiki $ git rebase master

The rebase command first checks out the working copy of the code from the head of the specified branch, and then reapplies the commits we made on our branch.

I then test, backup the repo, and deploy the changes.

Done!

This strategy is perfect when you have a single repository (although not THAT likely if you are using Git). In the next part I'll show how to manage client code using both rebase and merge.

Tuesday, June 17, 2008

And now the news...

Image of news section of Radio NZ siteOne of the challenges with publishing news onto the Radio NZ site was getting the content from our internal news text system into our Content Management System.

The newsroom uses iNews to prepare all their copy. The website uses MySource Matrix, a CMS used by many Australian organisations and now starting to get some traction in New Zealand since the local office opened.

There were three options:
  1. Use iNews to generate the site.
  2. Get staff to use the CMS directly.
  3. Wire the two systems together in some way.
The first wasn't really an option because we had content from a range of sources (news, audio, schedules, etc) and we wanted to blend those into one cohesive site.

The second was considered, but deemed too hard because of the need to create a large custom editing and management area in the CMS. We did not have the resources to build, maintain and support this, along with the required staff training.

The last option was to write some software to allow iNews to publish directly to the CMS.

How it Works

iNews is able to output stories in a specified order via ftp. Staff compile the stories for each publish and press one key to send the content for processing. The stories end up on an internal server in HTML format, with an extra file noting the original order.

Processing HTML is always a challenge - the code generated by iNews was not always well-formed - although I already had some software that worked courtesy of Radio NZ International. They'd been publishing content from iNews to their site since 2002, and the script's run there with no issues for 5 years.

The script is 750 lines of Perl code, and runs via a cron job. It reads the order file and processes each HTML file. Files are parsed for metadata such as the published time, and the story content is turned into valid pre-formatted HTML. This is wrapped in XML and pushed to the CMS server.

One of the major advantages of this approach is that staff do not have to learn any HTML, and the system generated HTML can be relied on to meet our site style guidelines. We have defined some formatting codes for use in iNews for basic web formatting:
  • [h] Heading
  • [s] Summary
  • [b] Bold paragraph
  • [[text]] Italicize
When we first added news content to the site (in 2005) the summary line was auto-generated - the home page had only four headlines. The current version of the site has a summary under the first story on the home page, so the [s] directive was added to allow one to be crafted by a human.

The script will still add a summary if there is none, as the main news page needs one for every item.

The CMS has an import script that takes the XML data and creates news items on the site. This is activated via a local network connection to our master servers.

I am currently working on an enhanced version of the script that'll allow stories to be categorised and some other cool stuff. More on this in a later post.

Saturday, June 14, 2008

Using Git

This post has moved to here.

Friday, June 13, 2008

Improving your CSS

The current version of the Radio NZ website was launched in February 2007. A number of people have asked me about the CSS for site, and particularly about the size (only 24k, uncompressed). The previous version of the site had about 85k of CSS.

We use gzip compression on the site, so the served filesize is only 6k, but there are other techniques I used to get the initial file size down.

It could be argued that such optimisations are pointless, because any improvements are swamped by the amount of time it takes for the content to traverse the internet. Some prefer maintainability and readability over optimisation. This is true to a point, but only on broadband. We still have a lot of dial-up in New Zealand, and in these cases the speed of the connection is the bottleneck, not the time taken to travel over the net.

The other issues are performance and cost. If you reduce the size and count of files your servers will be able to deliver more requests. If your traffic is metered then any reduction in size saves money. If you are unconvinced read the interview with Mike Davidson regarding the ESPN relaunch.

My aim is to get the HTML and CSS to the browser as fast as possible so that something can be displayed to the user. The load times on pages has a direct effect on the user's perception of quality.

Here are some of the techniques:

1. Using one file.

This reduces the number of server requests (which speeds things up) and ensures that the browser gets everything it needs at once.

2. Reduce white-space.

All rules in our css file are one line each, and there is minimal other white-space. Even though compression will reduce strings of white-space down to one character, stripping this out first ensures that the compression runs faster (fewer characters to process) and that redundant white-space does not have to be decompressed on the browser side. Prior to moving to a Mac I used to use TopSyle Pro which has some tools to convert a more readable version into something smaller, simply by optimsing white-space and some rules. I took a couple of CSS files from major NZ sites and ran them through cleancss to see what sort of savings could be made.

The first site serves a total of 400k on the home page of which 108k is CSS. This could be reduced by 25k with simple optimisations.

The second site serves a total of 507k on the home page of which 56k is CSS. This could be reduced by 28% for a 14k saving.

John at projectx did a more detailed analysis of the top NZ home pages and Government sites using the yslow benchmarks. Interesting reading.

3. Use CSS inheritance

I start all my CSS files this way.

*{font-size:100%;margin:0;padding:0;}

This rule resets all elements to no margin, no padding. (The font-size is required to sort out some rendering issues in Internet Explorer when using ems.)

It is a good place to start styling as it removes almost all the differences you'll see in browsers when you start styling a page.

One of the sites I reviewed before writing this had a body rule to reset margins and padding to 0, and then went on to reset again them on 8 sub-elements that didn't need it. They also applied other rules to elements where the parent element already had the rule.

This not only wastes space, but the browser has to apply and re-apply all these rules.

The process I use when writing CSS is to apply a rule and then check to see if this rule applies to all other elements within the same container. If it is, then the rule can be moved to the container element.

For example, if you have a menu item where you apply {font-size:10px; color:#000} to a <p> and and <li>. The color element can probably be moved to the body element, especially if that is the default for text on the site. The font-size can probably be moved to a div that contains the other two elements.

It is sometimes better to apply a rule to a container element and override it in a one of its children, than apply the same rule to most of the children.

By repeating this process common rules tend to float to less specific selectors at the top of the document tree.

Westciv has a article that explains inheritance.

4. Using CSS shorthand.

Taken from an NZ site, here is the body tag:
body{
font-family:Verdana, Arial, Helvetica, sans-serif;
font-size:10px;
color: #333;
margin: 0px;
padding: 0px;
line-height: 130%;
margin-bottom:0px;
font-size: 100%;
background-color: #FFF;
background-repeat:repeat-y;
background-position:center;
background-image:url(/body.gif);
}

This could be better expressed thus:
body{
font:10px/1.3 Verdana, Arial, Helvetica, sans-serif;
color:#333;
margin:0px;
padding:0px;
background:#FFF center top url(/body.gif) repeat-y;
}

And another:

#rule{
padding-left:12px;
padding-top:10px;
padding-right:12px;
padding-bottom:10px;
}

This could be more simply expressed as:

#rule{padding:10px;12px}

These savings are on top of any white-space removal. I'd estimate that the size of the CSS file could be cut in half for a saving of 28k.

4. Avoiding long chains of selectors

#side #menu ul.menu li.selected{rules}

These take up more space and take a lot longer to process in the browser.

5. Careful layout of the HTML.

We use a small number of container divs (some of these to work around browser bugs), and keep the selectors to access elements as succinct as possible. We don't use lots of CSS classes, instead using selectors on parent elements to target particular things.

An example is in our left-hand menu area. The left menu is positioned with a div with the id #sn. We can access the main menu with simple rules like #sn li.

If you look at the code though, you'll see the padding in all menus is applied via one rule: li {padding-bottom:4px;}, an example of inheritance.

I've not got into a great deal of detail on these, so I'm happy to answer any specific questions via comments.